
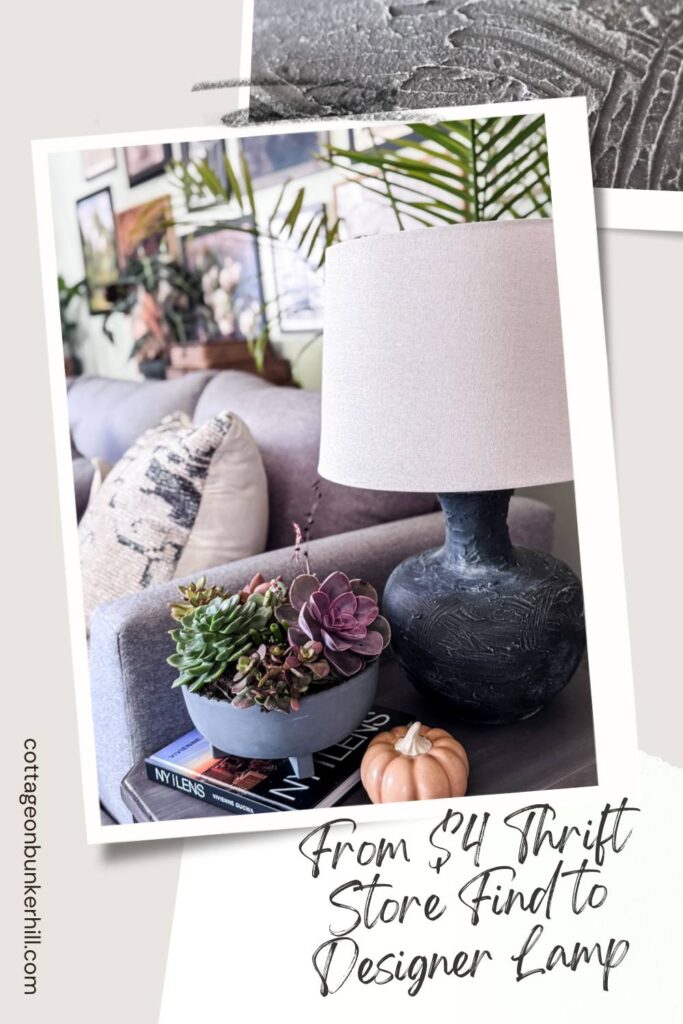
I’ll never say no to a good thrift store challenge! Especially when it involves a piece with great bones just begging for a little love. When I spotted this bold red lamp for just $4, my mind immediately started racing with possibilities. That glossy finish? Gone. The slightly-too-vibrant color? History. I imagined it with matte, textured depth, the kind you’d see in a quiet pottery studio or a high-end catalog. Using my favorite texturing secret (hello, joint compound!) and a bit of paint, I transformed this forgotten find into a one-of-a-kind statement piece. And the best part? You can do it, too.
Thrifted Lamp Makeover: How to Get a High-End Look for $10
Let’s be real: good lamps are expensive. Good textured, pottery-inspired lamps? Even more so. That’s why I’m always hunting in thrift stores for lamps with interesting shapes that I can easily make over myself. This $4 red lamp was the perfect candidate little dated, but full of potential. With some joint compound and paint, I gave it a completely new life and a gorgeous, custom look that feels both modern and timeless. If you’ve ever wanted to try a thrift flip, this is the perfect place to start!
This post may contain affiliate links, which means we receive a small commission if you purchase through our links. See our disclaimer page for more information.
Step-by-Step Tutorial: The Thrifted Lamp Makeover
Ready to create your own high-end looking lamp? This project is simpler than it looks, and the technique is incredibly versatile. Once you get the hang of it, you can use this same method to transform thrifted vases or even old pots, giving countless secondhand finds a beautiful, textured new life!
Materials for this Project
- Thrifted lamp with a ceramic, glass, or other smooth-base surface
- Joint compound (not spackle)
- Putty knife or tile trowel ( I used this for hashmarks)
- Matte black spray paint
- Acrylic paint in “linen,” “ivory,” or “oatmeal” (a neutral light tone)
- Large flat brush or old dry brush
- Lampshade (shop your own home first!)
- Drop cloth or cardboard to protect your workspace
Why You’ll Love This Project:
- Budget-friendly (lamp: $4, supplies: likely on hand or low-cost)
- Easily customizable (any color, any texture)
- Eco-friendly: saves items from landfills
- Creates a unique, high-end look without the high-end price
Step 1: Clean & Prep Your Lamp

Before you begin, give your thrifted lamp a good wipe-down with a damp cloth to remove any dust or residue. Since you’ll be covering it with joint compound, there’s no need to sand or prime the surface (yay for skipping steps!). Also, you will want to cover the light fixture and extension cord with painter’s tape to protect from overspray of the paint later.
Important Note: If you were only spray painting this lamp (without adding joint compound), you would want to lightly sand the surface first to help the paint adhere.
Step 2: Apply the Joint Compound
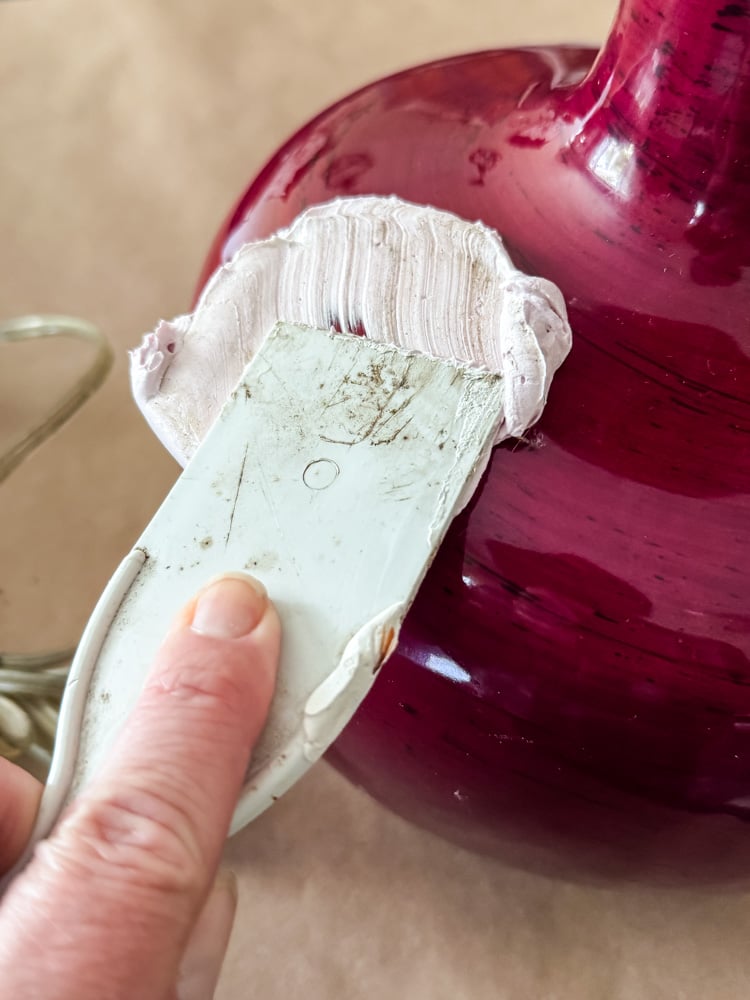
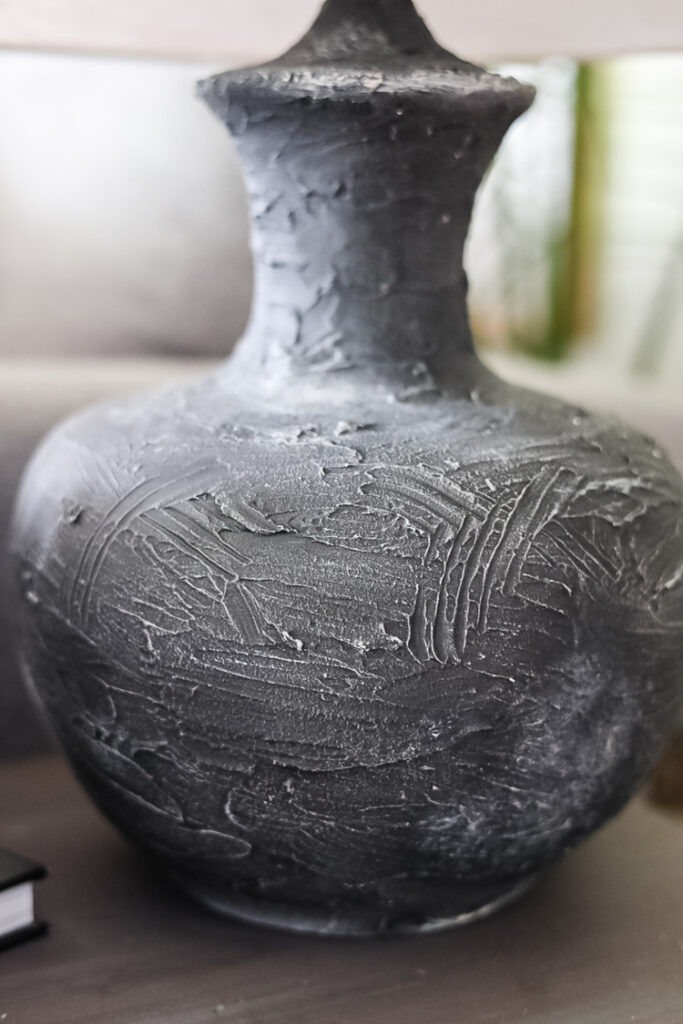
Using your putty knife, spread a thin, even layer of joint compound over the entire surface of the lamp base. Don’t worry about making it perfect; variations in thickness will add to the organic, handcrafted texture!
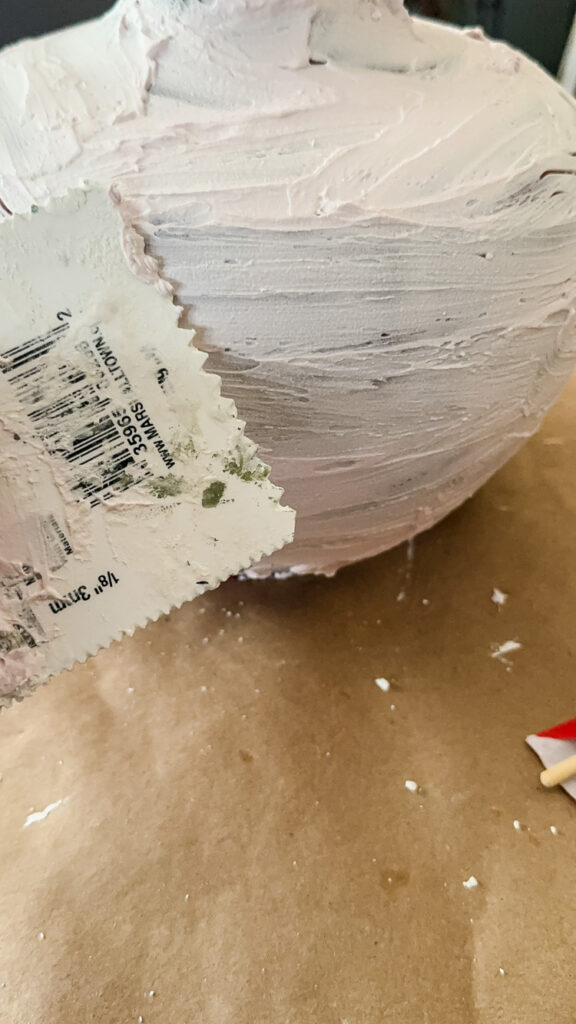
You are aiming for a thin coat covering all of the lamp’s surface. Remove excess with a putty knife or even your finger (it makes for quicker work using your finger, but is a bit messy!)
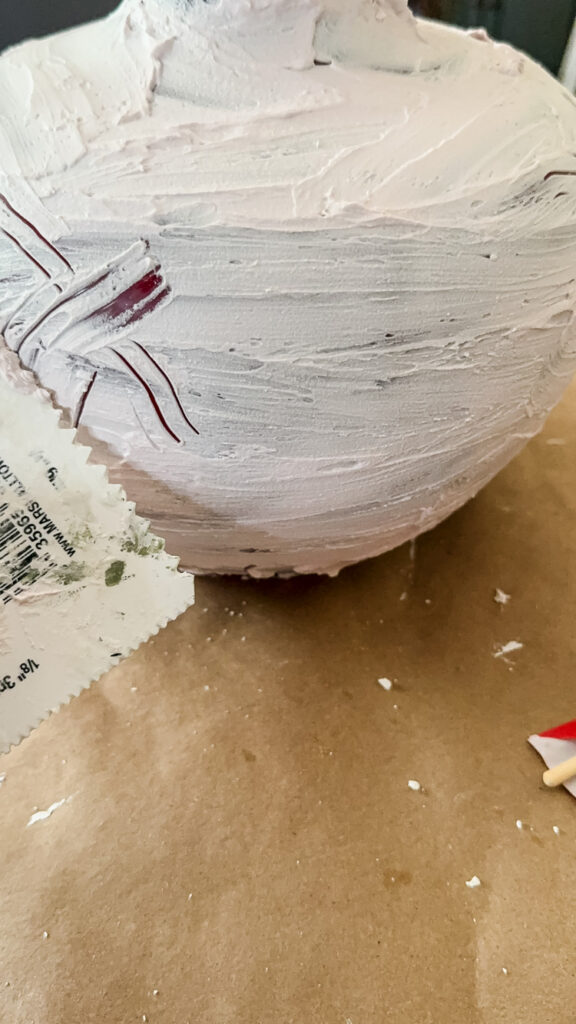
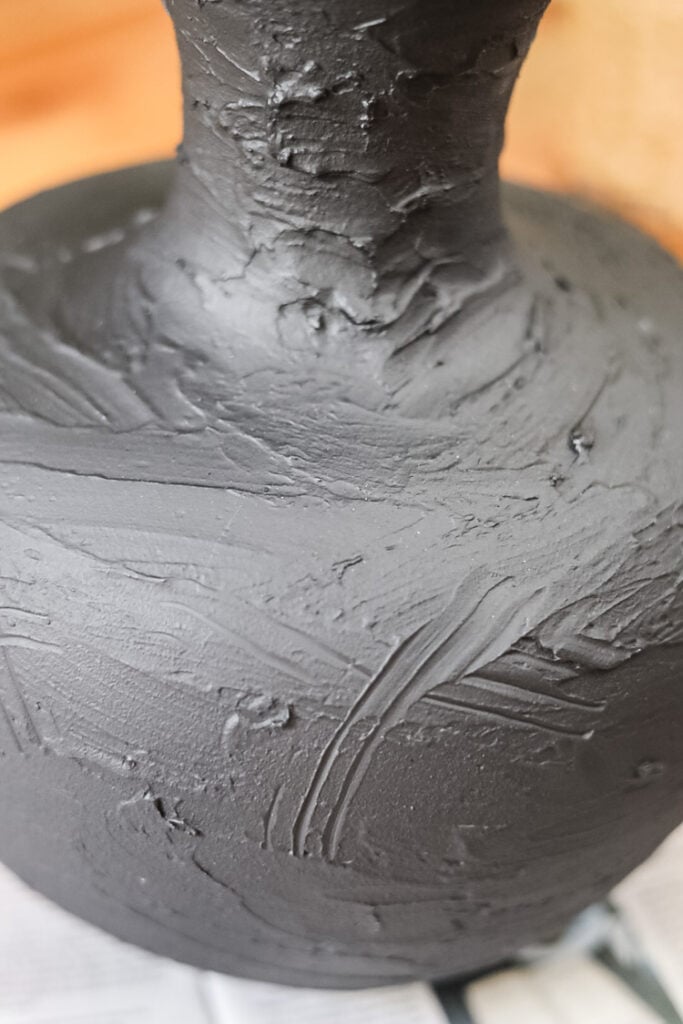
Pro Tip: While the compound is still wet, use the corner of your putty knife or a toothpick to etch hash marks, swirls, or lines into the surface. This will create beautiful depth once painted!
Allow the lamp to dry overnight in a dust-free area. This is the hardest part, waiting! But it’s essential for a solid base. The joint compound should feel hard and dry to the touch before moving on.
Step 3: Spray Paint the Base
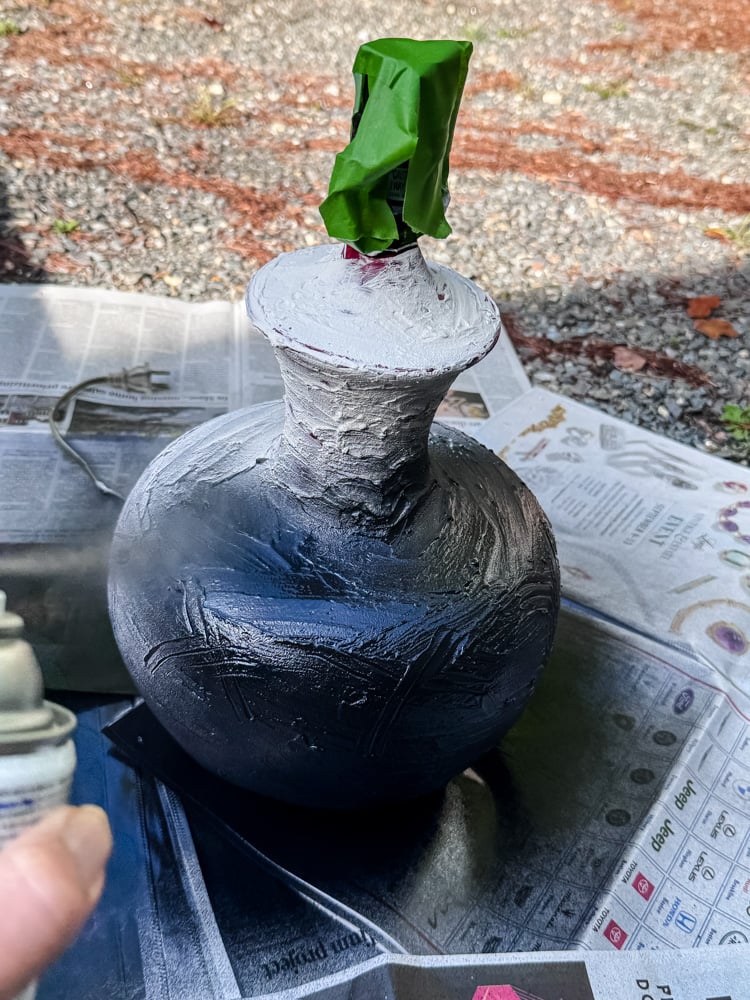
Take the lamp outside or to a well-ventilated area and place it on your protected surface. Apply 2 light coats of matte black spray paint, letting each coat dry fully in between. This dark base will make the next step—dry brushing really pop!
Spray Paint Pro-Tips:
- Shake the can well for at least one minute before spraying.
- Keep the can moving in smooth, sweeping motions to avoid drips.
- Spray from 10–12 inches away: too close causes runs, too far causes texture.
- Let each coat dry completely before applying the next (check the can’s instructions).
Step 4: Dry Brush for Dimension

You Will Need
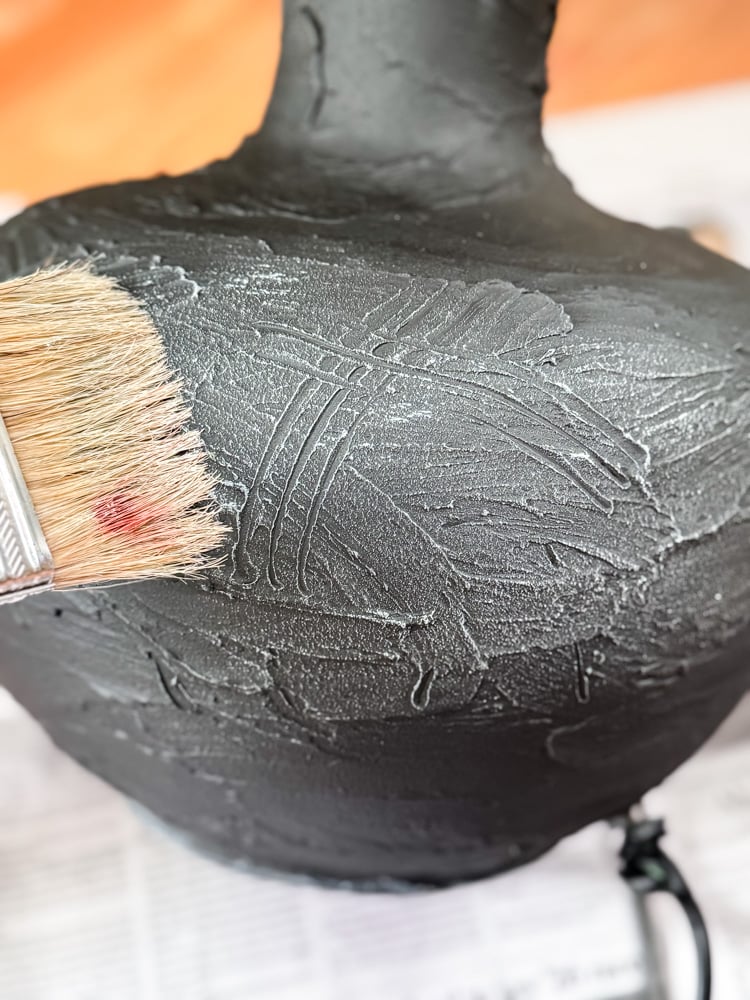
Here’s where the magic happens! Pour a small amount of your light-colored acrylic paint onto a plate. Dip your dry brush lightly into the paint, then wipe off most of it on a paper towel.
Gently whisk the brush over the textured surface of the lamp, focusing on the high points and etched details. The goal is to highlight the texture, not cover the black base. Build slowly until you’re happy with the contrast!
Step 5: Add the Finishing Touches
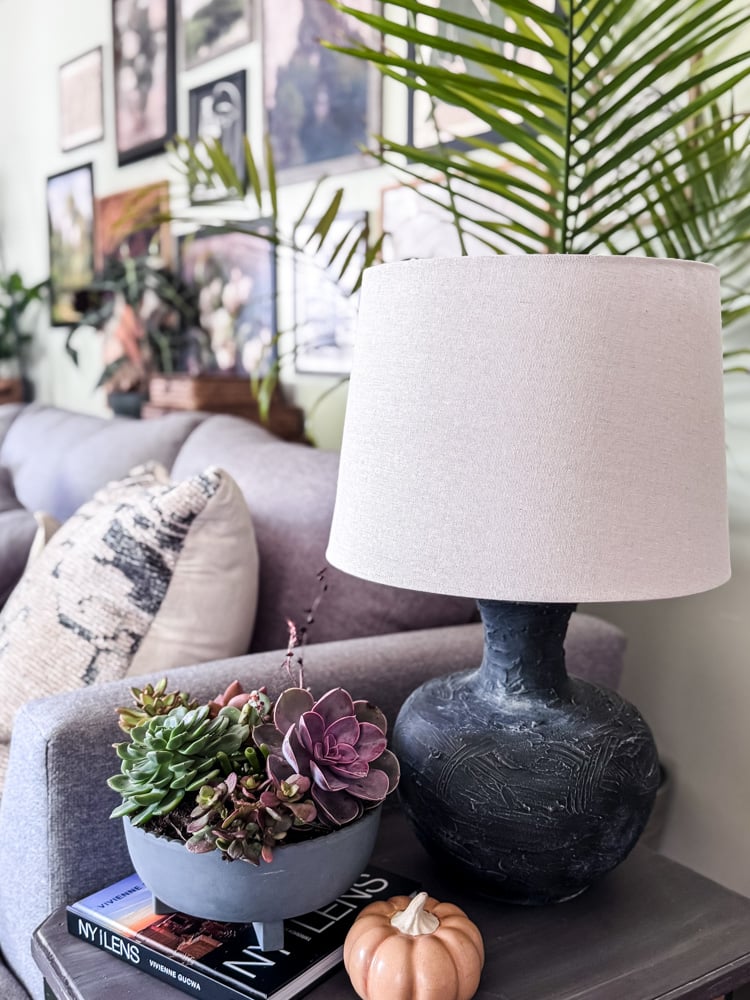
Once the paint is fully dry, top your newly transformed base with a simple, neutral lampshade. I chose a tan drum shade to keep the attention on the lamp’s beautiful textured finish. This neutral shade also helps tie the look together, since it matches the shade on the arched floor lamp across the room, creating a calm, cohesive feel in the space.
As the final touch, I swapped in a smart bulb, and I have to say, being able to control the brightness and turn the lamp on/off from my phone is an absolute game-changer for cozy evenings!
Step 7: Style and Enjoy!
Place your lamp in a spot where the texture can shine on an end table, desk, or entryway. When turned on, it will cast a beautiful, warm glow and look like it came from a high-end boutique!
Why Thrifting is My Secret to a Beautiful Home
Before we wrap up, I wanted to share why I’m so passionate about thrifting, especially when it comes to home decor. It’s not just about saving money (though that’s definitely a perk!). Thrifting allows you to:
- Create a Unique Space: Your home tells a story-your story. Unlike mass-produced decor from big-box stores, thrifted pieces have history, character, and soul. No one else will have the same lamp, vase, or side table as you!
- Save Money & the Planet: Giving pre-loved items a second life is one of the easiest and most stylish ways to reduce waste. You’re not just saving money-you’re saving perfectly beautiful items from landfills.
- Unleash Your Creativity: There’s nothing more satisfying than looking at something overlooked and seeing potential. Thrifting challenges you to think outside the box and make something truly one-of-a-kind.
So next time you’re out browsing your local thrift store, look beyond the dust and dated finishes. With a little vision and DIY magic, you can turn someone else’s discard into your home’s next treasure.
More Than Just a Lamp Makeover
What started as a $4 thrift store lamp is now one of my favorite pieces in our living room but this project was about more than just a makeover. It was a reminder that style doesn’t have to be expensive, and that with a little creativity, you can create a home that’s both beautiful and meaningful.
I hope this tutorial inspires you to see the hidden potential in secondhand finds and gives you the confidence to try your own thrift flip—whether it’s a lamp, a vase, or something entirely unexpected. If you do, I’d love to see it!
See your projects featured! If you were inspired by this or any of my other DIY projects I would love to see them and add you to the Reader’s Spotlight gallery. Send a photo to me at jennifer@cottageonbunkerhill.com
xo, Jennifer
More Lamp Ideas For You!
Love projects like this? Don’t miss out! Join my newsletter family for more cozy, budget-friendly DIY ideas delivered right to your inbox. You’ll get exclusive tips, early access to tutorials, and all the inspiration you need to make your home feel handmade and heartfelt.


Love this lamp girlfriend.
Thanks my fried!!
What a great make over!!!
Thanks Wendy!!