
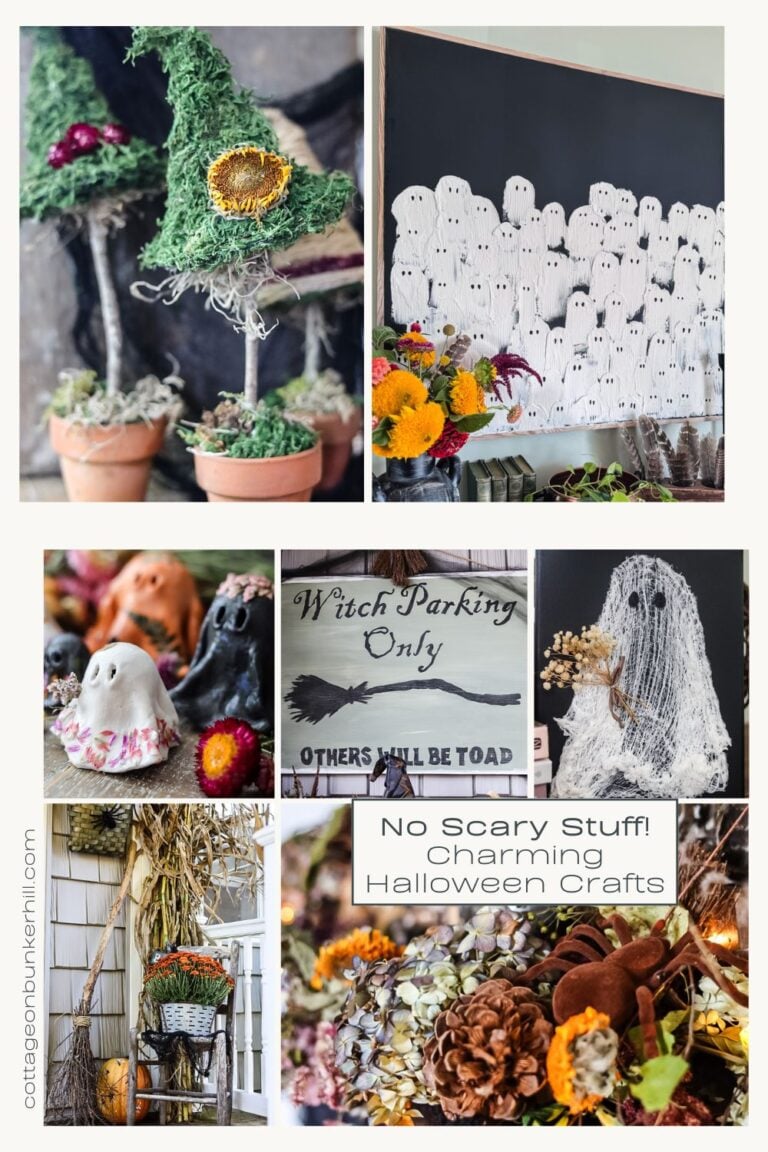
Who says Fall decor has to be all about fake leaves and plastic pumpkins? I’m sharing my favorite ways to use REAL flowers (fresh and dried!) from my garden to create stunning seasonal decor-from witchy Halloween brooms to elegant pressed-flower pumpkins.
No Faux Flowers Needed! 9 Natural Fall Decor Ideas from My Garden
If there’s one thing you should know about me, it’s this: I live for the magic of bringing garden beauty indoors.
As a lifelong flower lover, I’ve always believed that the best decor starts with nature, especially in the Fall, when the garden gives us one last glorious burst of color before the first frost. Over the years, I’ve made it my mission to turn those blooms into cozy, seasonal treasures that make our homes feel just as special as the outdoors.
That’s why today, I’m sharing 9 of my all-time favorite floral Fall projects—each one using flowers I’ve grown, foraged, or lovingly dried. From whimsical Halloween creations to elegant Fall front door wreaths, these DIYs are my way of celebrating the season and the garden’s gifts.
So whether you’re snipping the last hydrangeas of the season or raiding your dried flower stash, I hope these ideas inspire you to bring a little garden-grown charm to your Fall decor!

This post may contain affiliate links, which means we receive a small commission if you purchase through our links. See our disclaimer page for more information.
9 Floral Fall Projects to Try
From rustic dried flower wreaths to enchanting Halloween creations, each of these projects celebrates the beauty of garden-grown florals in the most autumnal way. I’ve included a mix of quick decor updates and more involved DIYs – all using flowers you can grow, forage, or dry yourself. Let me show you these nine favorite ways to bring a little nature into your Fall decorating.
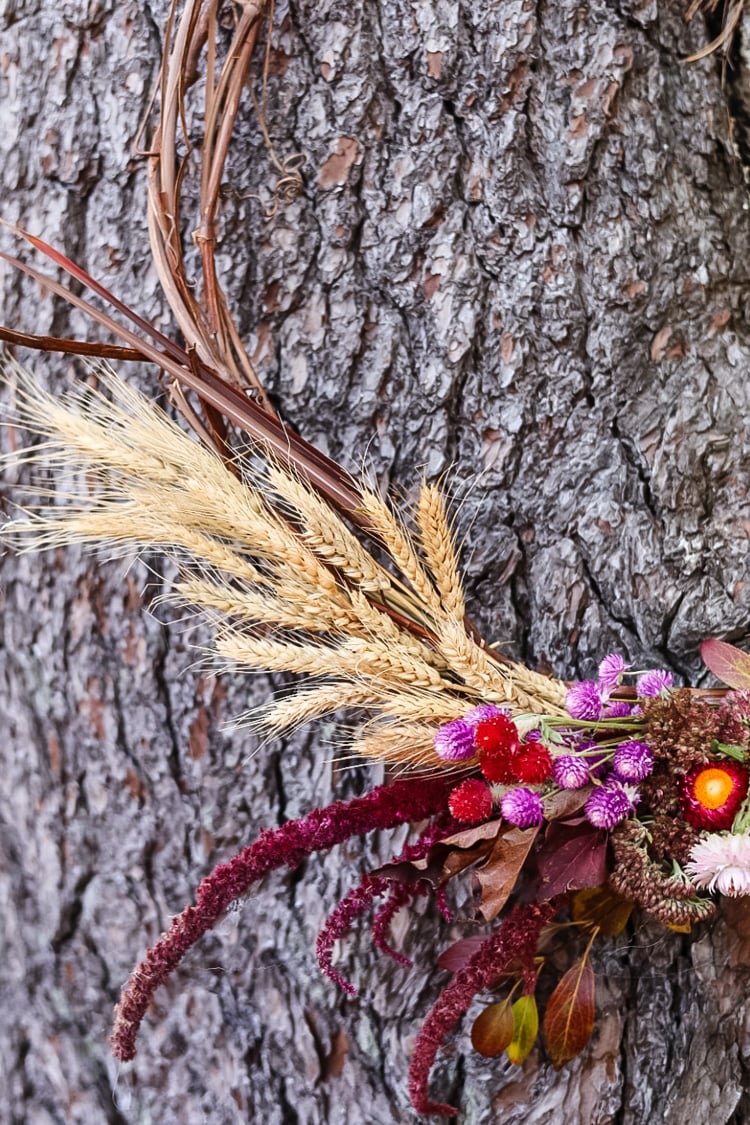
Floral Witch Broom

For your broom base, you’ve got two easy options:
- The DIY route – Forage a sturdy stick from your yard (like I did!) for a free, rustic look. I’ve used bunches of tall oregano for the broom.
- The instant-gratification option – Grab a cinnamon broom from the grocery store – they’re the perfect size and add cozy autumn fragrance!
Bonus: The cinnamon broom version makes your whole entryway smell like fall spice while looking gorgeous!

Let’s gather our materials!
First, take your clippers and forage flowers, herbs, and grasses straight from your garden. If you don’t have a garden (or need extra blooms), here are my favorite alternatives:
• Trader Joe’s (always affordable and fresh!)
• Local farmstands (perfect for seasonal varieties)
• Small flower farms (check Facebook – many grow the exact blooms I used!)

Pro Tip: The more textural and wild your cuttings look, the more charming your broom will be!
Additional materials that I used for my witch’s broom were dried wheat, pheasant feathers, dried orange slices, jute twine, and velvet ribbon.


Project Overview: Enchanted Floral Broom
This whimsical broom comes to life with foraged florals and natural textures! Here’s the simple magic behind it
The Basics:
- All materials are secured with floral wire (hot glue works too!)
- Start with larger blooms (like celosia) as your foundation
- Layer in smaller flowers and foliage for depth
Design Tips:
- Add feathers or dried grasses for movement and whimsy
- Let the arrangement feel organic – asymmetrical is charming!
- Remember: There’s no wrong way to create – make it your own
Want every detail? See the full tutorial
Time & Skill Level:
- Quick project (30 minutes)
- Easy – Especially if using a pre-made broom.
Grapevine Pumpkin Wreath

This lush, dimensional wreath combines autumn’s coziest elements- and makes the warmest front door welcome!
Project Overview: Double Pumpkin Wreath
- Built on two stacked grapevine wreaths for fullness
- Features sunflowers & hydrangeas from my garden
- Pieces of fresh eucalyptus for additional texture
- You could substitute faux flowers easily (easy to find artificial versions of these flowers)


The Basics:
- Layer wreaths and secure with wire
- Either tuck flowers between the grapevines or use hot glue
- Finish with eucalyptus or another type of greenery.
Design Tip:
I intentionally placed flowers at just four points (think compass directions) to create balance while letting the grapevine show through. Prefer something fuller? Simply continue adding blooms until the entire wreath is covered!
The best part? This wreath evolves beautifully from September through Thanksgiving! Get full instructions below:
Time & Skill Level:
- Quick project (30 minutes)
- Beginner-friendly – no advanced floral skills needed!
Autumn Leaf Clay Trinket Dishes

Nature’s elegance meets function! These delicate clay dishes capture every vein of real leaves for the perfect rustic-chic catchall
Key Materials
- Air-dry clay (or oven-bake polymer clay)
- Fresh leaves with strong veining (maple, oak, hydrangea, or magnolia work beautifully)
- Acrylic or spray paint (I love metallic for this project)
- Antique wax (brings out the details)
The Basics


- Prep the Clay
- Roll air-dry clay to 1/4″ thickness on a silicone mat
- Tip: Ensure the clay circle is larger than your leaf
- Create Impressions
- Center leaf vein-side down on clay
Gently roll with a pin for deep, crisp details
- Center leaf vein-side down on clay
- Cut & Remove
- Trace leaf edges with a steak knife (slow, smooth motions)
Lift leaf from the stem end to preserve delicate veins
- Trace leaf edges with a steak knife (slow, smooth motions)
- Shape Dishes
- Mold clay into greased oven-safe bowls or foil forms
For air-dry clay: Cure 24-48 hrs; bake clay follows package temps
- Mold clay into greased oven-safe bowls or foil forms
Finishing Touches

- Paint the leaf dishes with acrylic or spray paint.
- For added detail, brush dishes with an antique wax.
Time & Skill Level:
- Longer Project: A few hours to 2 days, depending on clay type.
- Intermediate: Rolling clay, shaping, painting.
Enchanting Floral Witch Hat

Key Materials
- Plain witch hat (black or velvet for luxe texture)
- Dried florals: Sunflowers, celosia, really any dried flower
- Unexpected accents: Pheasant feathers, dried berries, preserved mushrooms
To Age The Witch Hat

This project uses a black costume witch hat. If you want to make it look old, here’s the trick: cinnamon!
- Brush Mod Podge on hat with a foam craft brush
- Sprinkle cinnamon over the hat, let it dry, and shake off the excess.
The Basics


- I tied a piece of spooky cloth (Dollar Tree) around the base of the witch hat
- Hot-glued on the flowers and other decorations
- This is a fun project to let your creativity run wild!
For each step and exactly how I made this, click the button below to the full tutorial.
Time & Skill Level:
- Afternoon Project: IF doing the cinnamon aging trick, if just doing flowers than under 1 hour.
- Beginner Level: Only tool is hot glue gun
Dried Flower Wreath

Transform your preserved blooms into an end-of-season celebration of your garden’s beauty!
Key Materials
- Grapevine wreath form
- Dried floral variety: Hydrangeas (structure), sunflowers (focal points), amaranth(filler), smaller flowers like strawflowers to fill in empty spots
- Natural textures: Wheat stalks, bunny tails, lamb’s ear, & pepperberries
5 Pro Tips for a Perfect Wreath


- Anchor with heaviest blooms first
Start with sunflowers or hydrangeas as your structural base - Layer for depth
Mix textures – pair delicate baby’s breath with feathery grasses - Color with intention
Choose either harmonious tones or bold contrasts (both work!) - Celebrate asymmetry
Let one side flow more freely for organic charm for a different look - Finish with fillers
Tuck small blooms, berries or leaves into gaps for seamless fullness
It’s best to keep wreaths made with real flowers out of direct sunlight and protected from the elements. See the full instructions below:
Time & Skill Level:
- Easy Project: 1 hour to gather the flowers & make wreath.
- Beginner Level: Simple and fun!
Enchanted Foraged Broom

Who needs store-bought when the woods provide perfect rustic magic? This all-natural broom celebrates the art of ‘wildcrafting’
Key Materials
- 1 sturdy branch (a little crooked is even better)
- Twig bundle (look for straight, flexible shoots)
- Zip tie
- Natural twine (jute or hemp for rustic charm)
Project Overview


- Bundle tightly against your branch handle
- Secure with a zip tie
- Wrap twine around to complete the broom
- Run a string of fairy lights around broom handle and base
Time & Skill Level:
- Quick Project: Under 1 hour
- Beginner Level: Very easy
Pressed Flower Pumpkins

When delicate botanicals meet plump pumpkins – the most enchanting autumn union!
Key Materials
- Smaller pumpkins (smooth-skinned varieties work best)
- Pressed flowers (pansies, ferns, or delicate wildflowers)
- Decoupage medium (like Mod Podge) + soft brush
Why You’ll Love This
- Preserves your garden’s last flowers in a unique way
- Zero carving required! (I’m not good at carving)
- Perfect for small spaces & to use indoors
Garden-to-Gourd Magic


- Arrange larger flowers first
- Brush the pumpkin with Mod Podge, apply a flower, then brush the Mod Podge over the flower.
- Let dry completely
- Finish with matte spray (optional)
Get the full instructions along with all the other flower pumpkin pictures below
Time & Skill Level:
- Moderate Length: Pressing flowers & drying time of pumpkins
- Intermediate Level: There are a few steps to this one
Living Flower Pumpkin Vase

Why choose between fresh blooms and pumpkins when you can have both? This living arrangement marries autumn’s icons in one stunning centerpiece!
Key Materials
- Heirloom pumpkin (medium-sized)
- Assorted fresh flowers
- Floral foam (pre-soak)
- Gallon-sized plastic bag
- Wooden Skewer
Garden-To-Table Magic

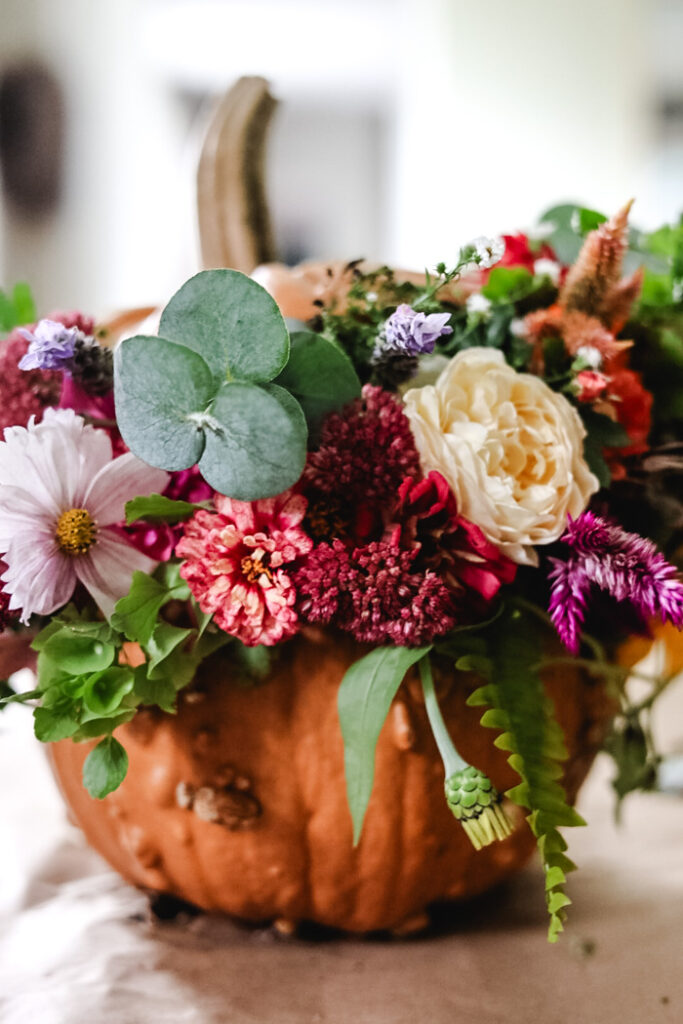
- Cut off pumpkin top (and save)
- Clean out the insides
- Add a plastic bag
- Insert pre-soaked floral foam
- Using broken wood skewers, float the pumpkin top.
- Arrange the flowers
I suggest you scroll through the full tutorial to see each step. This is a WOW project, amazing for a party centerpiece.
Time & Skill Level:
- Medium Length: 2 hours
- Moderate Skill Level: Prepping the pumpkin & arranging flowers
The Overflowing Garden Wreath

Summer’s lushness captured in wreath form! I love creating with my garden flowers.
Key Materials
- Oval grapevine wreath (Hobby Lobby)
- Fresh garden flowers & herbs
- Floral wire (optional)
Garden Bounty Essentials
- Herbs for fragrance: Rosemary, mint, lavender
- Flowers with sturdy stems: Zinnias, marigolds, sunflowers
- Trailing elements: Sweet potato vine, nasturtiums would be fun!
Pro Techniques


- Harvest in the morning when stems are most hydrated
- Tuck stems into vine crevices (no glue or wire needed)
- Mist daily to extend freshness
For more information, see the step-by-step
Time & Skill Level:
- Quick Project: 1+ hour
- Beginner Level: No special skills required!
Preserving the Season’s Magic
I not only love the entire process of growing my own flowers but being able to use them in creative projects long after the season is so satisfying for me!
Whether it’s a witch broom wrapped in colorful celosia or a pumpkin decorated with flowers that I pressed myself, each creation carries the story of a season loved well.
I hope these ideas inspire you to look at your garden (or even a Trader Joe’s bouquet!) as the beginning of something beautiful just for your home, but for your heart!
If you’d like to create your own floral keepsakes, I’ve shared all my secrets in these tutorials:
- Stop Wasting Flowers! 4 Foolproof Ways to Press Blooms Like a Pro
- The Best Flowers for Pressing: A Guide to Choosing the Right Blooms
- Microwave Pressed Flowers (Quick & Easy!)
See your projects featured! If you are inspired by this or any of my other DIY projects, I would love to see them and add you to the Reader’s Spotlight gallery. Send a photo to me at jennifer@cottageonbunkerhill.com
xo, Jennifer

Fall Inspiration
for decorating your porch:


I love these ideas! I can’t wait to make them with the flowers in my garden. Thanks so much for sharing!
Love all these decorative ideas! Thanks Jen!❤️
Thanks Auntie!